|
Special Hobby's 1/48 scale
Fairey Albacore
by Hubert Ortinger
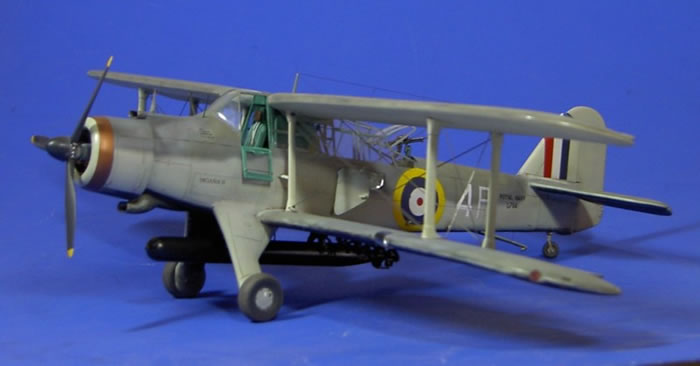
|
Fairey Albacore |

Special Hobby's 1/48 scale Albacore Mk.I is available online from Squadron.com
Background
The Albacore, sometimes nicknamed "Apple Core", was originally planned as a replacement for the outdated but widely used Fairey Swordfish.
To design a biplane at this stage, with fixed landing gear, flaps and slats seems amzing. To my mind it raises the question of whether the airplane would be able to remain in the air! It would have made sense and been cheaper, to construct a new enclosed cockpit for the Swordfish. As a matter of fact, both types of aircraft were used in parallel and the Albacore was retired prior to the Swordfish, which were later to be replaced by the Fairey Barracuda.
The prototypes of the Albacore were based on the specification S.41/36 for a three crew torpedo bomber/reconnaissance aircraft for the FAA. The first two prototypes were started in Dec. 1938 and production commenced in 1939. 98 planes were built initially. The first examples were equipped with the Bristol Taurus II engine, while later aircraft received the greater Taurus XII.
In March 1940, the FAA Squadron No. 826 was established specifically for the deployment of the first Albacores. Their task was to patrol the English Channel. The first carrier based units operated from 1941. Ultimately, there were 15 FAA Squadrons, which were equipped with Albacores. These fought in the Mediterranean at the Battle of Cape Matapan, at El Alamein, upon the landing in Sicily and the Operation “Avalanche” in Salerno. In the period between September 1941 until end of June 1943 the unit 828 operated out of Hal-Far in Malta during attacks while at the siege of Malta mainly against Italian ships and coastal targets in Sicily. Albacores even played a major role in the 1942 the invasion of Madagascar. By 1943, Albacores were exchanged fort he new Fairey Barracuda. The last British-Albacore Squadron, 841 Sqn, was dissolved towards the end of 1943. The Royal Canadian Air Force took the aircraft on charge, which were used during the invasion of Normandy.
Special Hobby's Kit
The tires are the best! The rest can be best described as "short run". Fuselage and wings are still acceptable, a second transparent part or similar would be desirable to achieve opened side windows. There are also some resin parts for bomb-holder, MG and cockpit interior. A radio and electronic equipment for the radio operator / navigator, one searches in vain. The small etched parts with seat belts and Instruments should probably calm some model builders. There are neither bombs nor a torpedo, and I've seen better construction manuals. A drawing of the rigging would not be too much to ask!
Cockpit / fuselage
I began by detailing the interior construction of the fuselage with carving former from plastic card. Various struts have been suggested with profiles, finally, the transparent part is quite big and in addition to the open rear window I wanted to display even the side windows/entrances of the pilots open, and cut out the door for rear gunner/navigator, what granted a wonderful insight into the interior. Unfortunately, however, I found less meaningful photos of the interior, otherwise I would have even laid more stuff into.
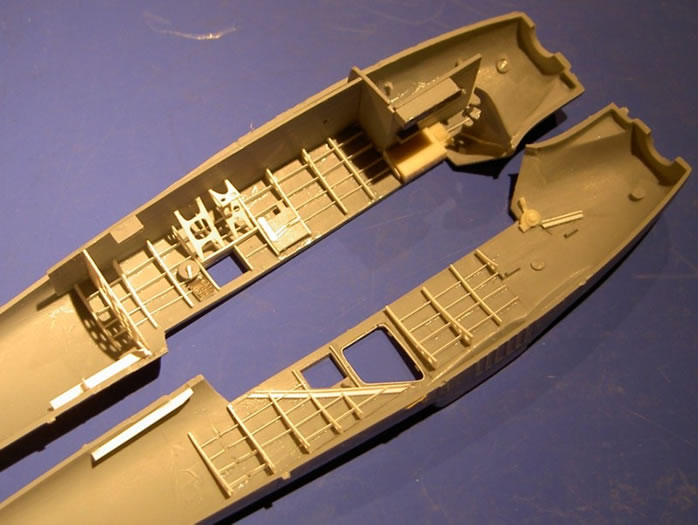
The chairs for the rear pilots who used to sit back to back could be folded to the side, so I revised it with wire and at least assembled one in this position. Temporary I built a radio, the armor behind the headrest of the pilot, supporting structure for the upper wing and cut out and replaced the door. The fuselage tank was glued, milled and received reinforcement tapes from Tamiya tape. Although restored Albacores clearly appear yellow, I decorated the interior with Revell "Seagreen" painted, which I've even used for my Sea Gladiator. Partially brightened and washed with diluted oil-based paint, anything was concluded drybrushed yet. Some highlights in form of colorful buttons, levers and switches on the instrument/radio panel, linen colored seat belts and accentuating various other objects decides this phase of construction, and the fuselage halves can be glued.
Control surfaces
Next, I devoted the wings, treble and rudder where I cot of the control surfaces. The missing material was replaced semicircular plastic profiles - any columns refilled with superglue and baking powder - then milled. To fit them in perfectly again, the bush must be scrapped thinner and they must equipped with hinges. Before the final gluing, these consignments were painted black. The rear edges should be thinned (sharpened), witch turns of to engrave trim tabs and flaps. Left and right of the lower wings I sawed out the position lights and stuck transparent material into, in which I drilled holes to imitate colorful lights. After milling these parts, I masked them and they became a glossy coat after the overall painting.
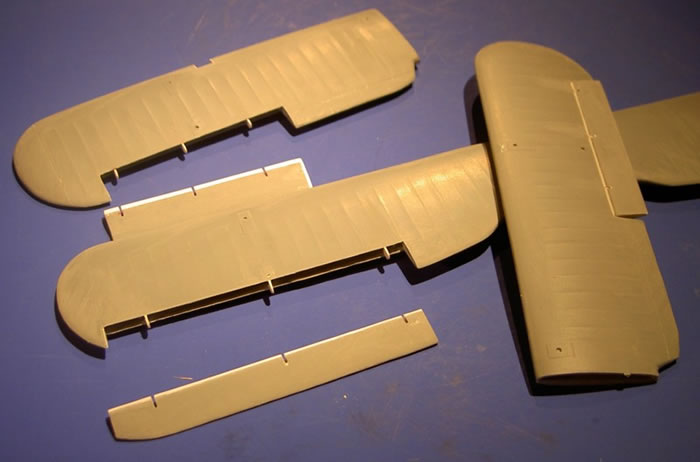
For the stability of the bottom wing I caused with two brass rods below the cockpit floor.
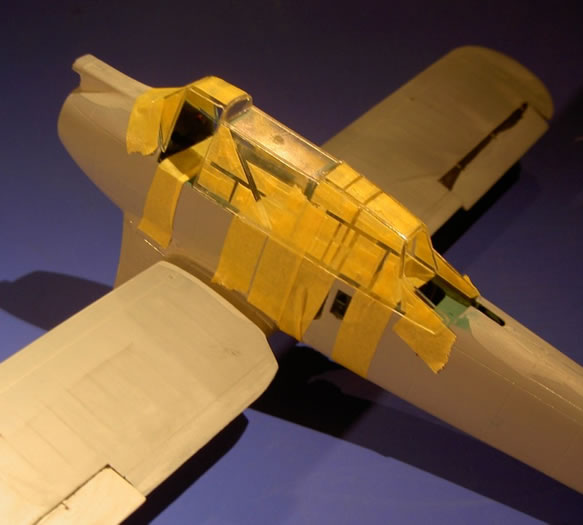
Since the upper wing rests on the cockpit hood the onset is of the quest, which initially only glued on top should be no problem. At this stage the pulpit need to be masked. As I mentioned earlier, I have sawn out the left and right clear parts for the pilots entrances to ensure to look into the cockpit.
Main and rear gear are no problem whereat the tail painted separately, and was glued at the end. The front tires of course, too!
Meanwile the bombs sway braces had to scratch from plastic brackets and plastic profiles using the Punch and Die Set, because I do not actually abolished the beautiful Resin parts without breaking!
The engine is again a major challenge. The cylinders and the engine block are beautiful resin casts, but Special Hobby obviously still did not heard anything about a exhaust system! Like usual at Fairey, the exhaust directed forward in a collective ring which was part of the Cowling and than guided into the open exhaust.
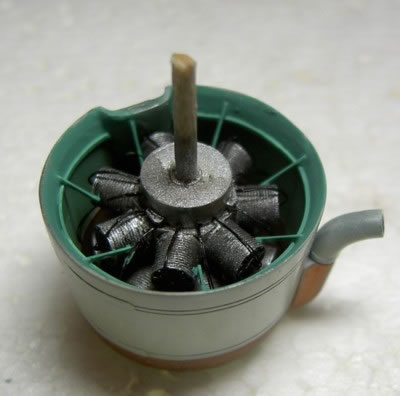
This individual manifolds had to bent, adjusted and "sealed" in laborious work of small round plastic rods until they found their way into the collective ring. I drilled tiny holes in the cylinder heads and stuck the ignition cable from the rear After completion and painting the finished engine will be held in place in a large hole on the front of the fuselage. According to instruction the cowling had to glue there only on a small patch. That isn´t particularly stable, nor best in any form of manner. So I structured the interior and fixed it with profiles at the front and rear on the engine block or cylinders.
The painting itself was easy. Cylinder in aluminum, engine block and sump in gray - Washing with oils and drybrushed in silver or light gray. The manifolds of the exhaust system and the collective ring were colored bronze/copper.
As a primer I chose the interior color of the cockpit, which shine through the canopy as the struts in interior color . Than you can even see in the smallest inaccuracies of the surface, which then could still be eliminated.
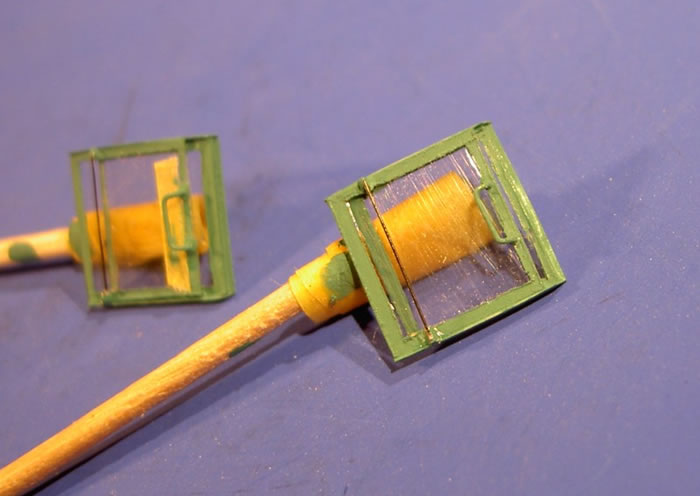
After milling, washing and drying I started with "Sky" as a application to the flanks, the tail side, the lower wings and the underside. Although I decided for a Albacore with black underside I had chose this procedure because I later wanted to pop off the black on the front edges of the wings and landing gear struts , as I had seen it to a model in the publication "Warpaint".
Finally, these camouflage was probably applied on site and accordingly low was the grip. Even if the planes were based at land the camouflage was as typical as a Fleet Air Arm machine. Extra Dark Sea Gray and Dark Slate Grey from X-tra Colours, which cured gloss, formed the basis of the camouflage and were already brightened before applying. With a again lighter colour again, I emphasized then the ribs of the formers and individual panels of planking.
Of the four proposals markings I chose the Albacore Mk.I, # L7114 of pilot Lt.Cdr. Tuke, served in the 826. Squadron. This Squadron was the first Albacore - Unity with Front experience and was stationed in the south of England to patrol the English Channel, alight countenances and bombing ports, mainly in Holland. While such a use of service the aircraft was shot down on Sept 11. 1942.
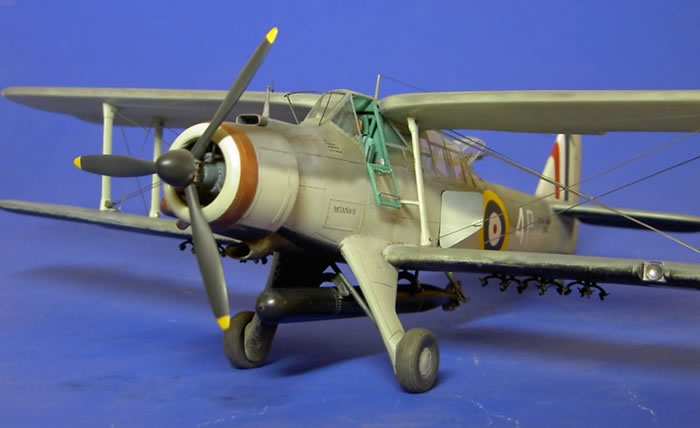
Even though I didn´t find an original photo of any variant, I decided for this aircraft, since in the Warpaint Series No.52 a colour pic is printed, although some of the components of painting proposal departs, it seemed most attractive for me. The decals are OK, but could include some maintenance stencils at least, which I therefore took by a Hurricane sheet.
I supported the application of the decals on the shiny surface with Set and Sol what guaranteed an optimal result. With a silver colour pencil, I imitated subtile scratches, wherever it could be possible tinker that the basic colour was worn and the bare metal came out.
As a conclusion I have sprayed flat clear coat over all before I finally twiddled the etched wiring in the provided holes. It makes sense to glue them just only on one side for these were so that they can´t bend for temperature fluctuations.
Thankfully I still have a Swordfish kit in stock where I borrowed a torpedo. Flat black lacquered and polished after sufficiently drying, brings this process the best silk shiny. I gladly would have even mounted a few bombs, but it just would not be fair because the Albacore would have been ornately.
The Fairey Albacore is not one of my best works, and I didn´t really enjoy tinkering with this limited run kit. Nevertheless, it was a challenge to build this extraordinary airplane.
I recommend this kit only to experienced and ambitious model builder.
Model,
Text Copyright © 2009 by Hubert Ortinger
Page Created 26 February, 2009
Last Updated
26 February, 2009
Back to HyperScale
Main Page |
Home
| What's New |
Features |
Gallery |
Reviews |
Reference |
Forum |
Search