|
Accurate Miniatures' 1/48 scale
Focke-Wulf Fw 190 A-8
by Floyd S. Werner Jr.
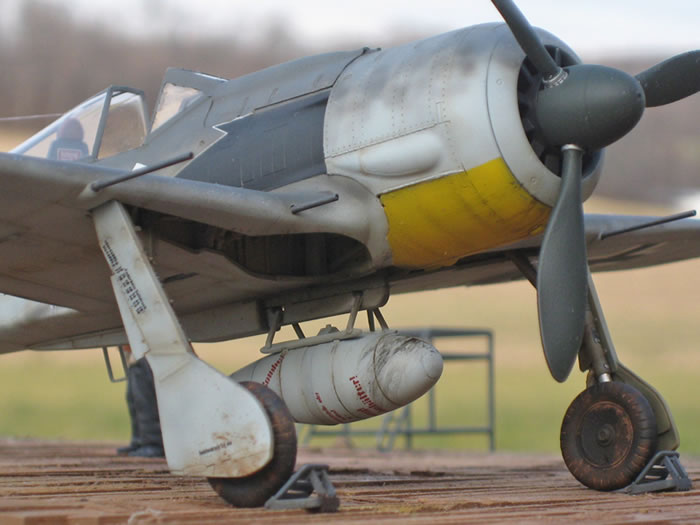
|
Focke-Wulf Fw 190 A-8 |

Eduard's 1/48 scale Fw 190 A-8 Weekend Edition is available online from Squadron.com
Background
I won’t go into the history of the aircraft, however, I will touch on the subject of this boxing, Pips Priller. With the exception of Adolph Galland, Pips Priller is arguably the most famous pilot in JG 26. He is most well known for being outspoken and for his attack on the D-day beaches, made famous in the movie “The Longest Day”. He and his wingman weren’t the only pilots flying on D-Day they were just the only ones to fly over the beach.
The Model
Having recently built the Eduard Fw 190 F-8 I went into this build with a slight advantage. The Accurate Miniatures kit is actually the Eduard kit. It is not hidden as all the sprues have Eduard printed on them. The model contains everything that is in the Eduard Weekend Edition kits, except Accurate Miniatures includes markings for three aircraft.
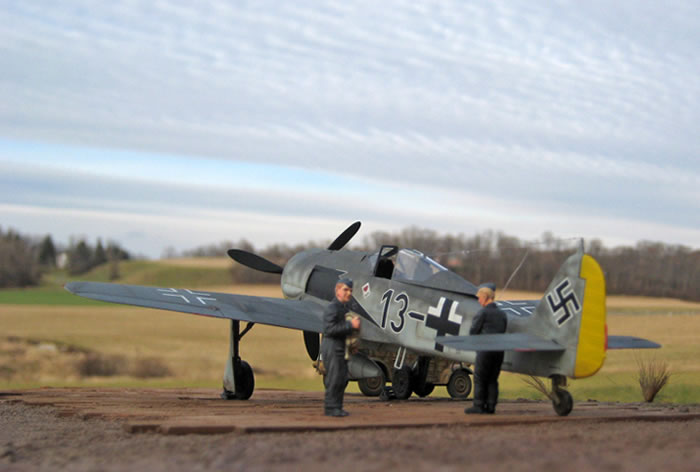
The model is molded in an shade of green grey. There is very little flash on the parts. There is a sprue of clear parts that is very nicely done. Decals for three aircraft are included. The boxing is typical for Accurate Miniatures with the decals and the clear parts being separated from the rest of the box by a cardboard painting of Priller’s aircraft . The instructions are a lot like Eduard’s but they are different.
Oops...
I found some things in the instructions that I want to clarify. Step 3 is particularly flawed. Read the instructions and follow them. The instructions are correct, however, the pictures may not show you what is printed on that particular page. In Step 6, #6 and 7 the gun barrels are not J53 and J58. Those parts are actually the cowling mounts. You’ll know what a gun looks like. The actual guns are not shown in the instructions, nor are the ammo boxes/breach blocks. The breaches are mentioned in Step 2 but the ammo boxes aren’t mentioned or shown, don’t forget them. Bottom line, you will need to add the ammo boxes before Step 5. Don’t forget them. There is mention of photo etch parts for the cooling fins and the wing armament covers when closed but there is no photo etch included in the kit. Now that you know these things you are ready to start your model too.
Cockpit and fuselage
The cockpit builds really nice right out of the box. Really all that is necessary to spruce up the cockpit are some seatbelts. I used some Fine Molds seatbelts I had in my spare parts box. The plastic side consoles and instrument panels are adequate. I painted the interior parts with Gunze RLM 66. A wash of black artist oils and a dry brush of RLM 02 and silver were all that was needed to give the cockpit life. Silver pencil was used to replicate some chipping. A drop of Micro Krystal Clear was added to each gauge.
The cockpit gets sandwiched in the fuselage. There are some really nice locating mounts for the cockpit that will ensure proper alignment.
A key point is the alignment of the two bulkheads and gun tray. If you screw this up your engine may not be aligned. I used a square to ensure that all the angles were 90 degrees. Also don’t forget the ammo boxes. They are not mentioned but are necessary. I checked my Eduard Weekend Kit instructions and they are in there. Must have gotten lost in translation. The fuselage itself fits beautifully with no issues.
The wings
The key point of the wings is the vertical alignment of the Main Spar. You can ensure this by adding part K-20 and letting it dry. Before you glue that part in if you are going to have the drop tank rack on there don’t forget to open the holes for the mount. Now that the holes for the centerline rack and the wing guns are drilled out it is time to add the main spar. I can’t stress this enough- MAKE SURE THE SPAR IS VERTICAL. This affects the landing gear angle and will throw everything else off. The cockpit, spar, engine and landing gear are all interlocked so any alignment problem will manifest itself everywhere.
As I mentioned, the pictures and the text do not say the same thing sometimes. Just read the instructions and look for the picture. Nothing is not mentioned in this subassembly but may not be shown. Be careful if you are having the gun bay open or closed. I wanted mine closed just to see if it can be done. Since I elected to have my ammo bays closed I had to carve out the area on the upper wing. Fit of the upper wings to the lower one is really no hassle. Again the fit was very good.
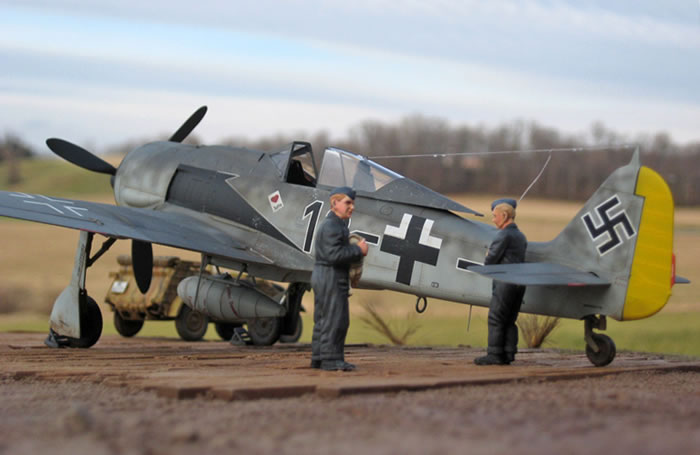
Fitting the wings to the fuselage presented no problem. Everything keys into the next assembly. Again if your alignment is good then the model is easy enough to assemble. With that said not all was good, the wing root ammo bay cover did not fit as well as I would have liked. I had to add some styrene stock and filler to get them to fit properly. Nothing too extravagant but I did have to do some work here to get a closed wing root.
Aligning the horizontal tail surface is easy, however, the fit is loose. I set each one with some liquid cement and then just aligned them with the fairing. If you do this properly then they will set themselves at the proper angle with no problems and no filling whatsoever. I’ll add the rudder later as it is painted yellow on Priller’s machine so I don’t need to add it yet.
The engine
I loved the ease of assembly on the engine. The only part that even required thinking about was the exhausts. They were actually easy with the special alignment tool. I used white glue to hold my tool on securely until I was done on it. I can’t remember but I seem to think that the numbers on the parts might be incorrectly called out. I could be wrong. I removed my exhaust stacks early and labeled them on a 3 x 5 card. It is possible that I marked them incorrectly. Either way it worked really well when I got everything together. It is a shame that I was going to have the upper gun cover closed.
The mounting of the engine to the supports was not a big issue. One thing to do is to make sure part K-18 fits into the inset part of the wheel well. This will give you strength and will ensure alignment with the cowling.
I was initially worried about the cowling with shades of the Dragon offering, but no worries with this one. Start at the top panel and let dry. Then work the two side panels and really the fit is perfect. Add the front cowl ring and that is really all there is. Don’t forget that part J58 and J53 are not the guns they are actually the mounts for the forward cowling. It is funny because part J11 is called the cowling support brace which is what all three parts are.
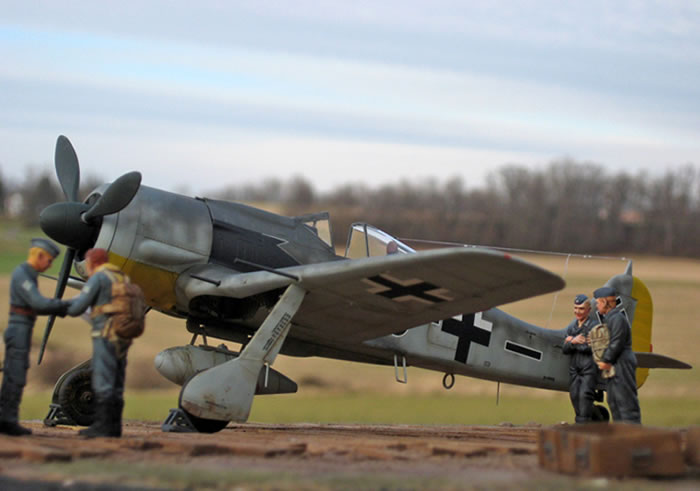
OK so I wanted to have the upper cowling closed, would it fit? Yes and no. It will fit but you have to do some sanding. The gun breaches and the guns themselves are literally sanded down. Since this area won’t be seen with the cowling closed you don’t have to be too careful. Just sand the top of the parts down to allow you to add the cowling without any gaps and glue it in place. No problem. This part fits great once you sand the guns down.
Odds and Ends
The wheels fit very loosely on the axle so this calls for some 5 minute epoxy. Thankfully Accurate Miniatures provides a full size template to aid in the alignment. I used some Ticky Tac putty to hold my strut in place and added some epoxy to the axle and aligned the wheel with the help of some paint jars until everything set. This easily ensures the proper 8 degrees angle. Some chrome foil was added to the strut after the assembly was painted RLM 02.
Fitting the landing gear is actually quite simple and surprisingly sturdy. You will have to adjust them slightly, however, they are really easy compared to other manufacturers.
 After washing the model with Dawn dish detergent and wiping the model down with Polly-S Plastic Prep the whole model was primed with Alclad Grey Primer. Anything needing cleaned up was taken care of and reprimed. Preshading with Model Master Flat Black sets the basis for the top colors. The lower cowling and rudder were given a coat of Tamiya Flat Yellow. When dried the lower cowling was masked off. Using my new Grex pistol grip airbrush it was time for the Model Master RLM 76. Once it was laid down I lightened it with some white and did some post fading. Model Master RLM 75 was laid down over the entire upper surfaces and mottled on the side using my new Grex double action airbrush. I love the action of these airbrushes. Gunze RLM 74 was sprayed on and mottled on the side. A quick mask for the exhaust area and it was shot with Model Master Flat Black. A coat of Alclad Clear Gloss was applied to the whole model to prep for the decals. After washing the model with Dawn dish detergent and wiping the model down with Polly-S Plastic Prep the whole model was primed with Alclad Grey Primer. Anything needing cleaned up was taken care of and reprimed. Preshading with Model Master Flat Black sets the basis for the top colors. The lower cowling and rudder were given a coat of Tamiya Flat Yellow. When dried the lower cowling was masked off. Using my new Grex pistol grip airbrush it was time for the Model Master RLM 76. Once it was laid down I lightened it with some white and did some post fading. Model Master RLM 75 was laid down over the entire upper surfaces and mottled on the side using my new Grex double action airbrush. I love the action of these airbrushes. Gunze RLM 74 was sprayed on and mottled on the side. A quick mask for the exhaust area and it was shot with Model Master Flat Black. A coat of Alclad Clear Gloss was applied to the whole model to prep for the decals.
Decals
The decal sheet is very comprehensive and has markings for three different aircraft, one of them is an A-8/R2 Rammjaeger. The instructions don’t call out for the changes to the armament. Since I decided to do Priller’s machine I was good to go.
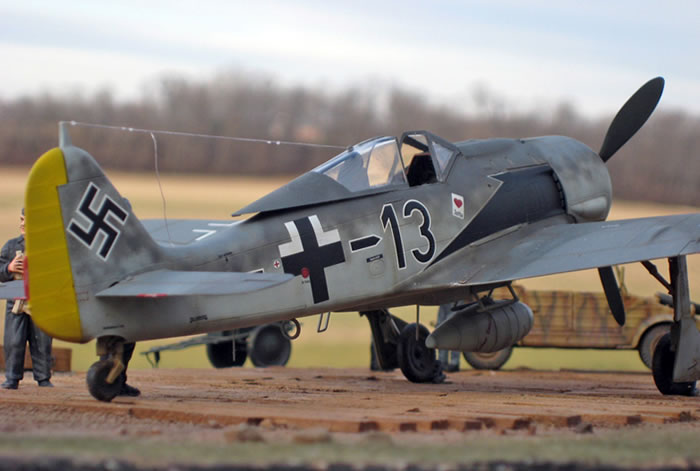
The decals settled down well with Micro Sol and Solvaset. I was worried about the “swoop” and how it would snuggle down. The swoop fit perfectly except for the strange cut part way down so I had to touch it up with some black but it proved no big deal.
All was not well with the decals though. First off the lower wing insignia (Decal #1), IMHO is too small. I ended up having to raid my spare decals and used an Aeromaster lower insignia. Also on the top wings the instructions call out Decal 11 but it is actually Decal 3. The “swoops” called out for Priller’s machine are incorrect identified. The instructions call out for 9 + 8 but in actuality decal 7 +10 are what is needed. The “swoop” with the white outline is the correct one. I also noted that the instructions call out for RLM 65 on the undersurfaces. This is incorrect and should be RLM 76. The biggest thing with the decals is there are no call outs for the drop tank or the landing gear struts both of which get a number of decals. I had to check my references as the decals were on the sheet.
Another coat of Alclad gloss and Testor’s Dullcoat are all that is required to get the model ready for the weathering.
Weathering
This is always my favorite part of modeling because it takes the model and makes it a miniature airplane. The weathering actually started already when the paint was put down and the pre-shading and post fading. Now I take a clue from the armor guys and what I like to do is add a very thin filter to the model. This is really just a very thinned wash applied to all the surfaces. This breaks up the monotony of the colors. A wash is applied to the panel lines and because the model has them, the rivet lines. Even if you did nothing else this would significantly add to the look of your model.
My next stage is to chip the paint. The chipped paint is achieved with a variety of methods. The first way I do it is with a silver pencil to the areas that I definitely wanted to have specifically chipped, areas such as foot and handholds. The next method was the sponge method. I used some Model Master Magnesium because it isn’t as bright as aluminum.
I added MiG Pigments for the mud stains on the wheels, landing gear covers, and aft of the wheels, including on the rudder. These were all set with the MiG Thinner.
This was followed up with the soot and stains. Two drops of Tamiya Earth Brown and Flat Black thinned heavily was built up slowly to make the exhaust stains and the gun residue. Another coat of Dullcoat sealed everything in.
My final level of weathering is the oil and fluid stains. I do this after the Dullcoat because the oil should be “wet” looking. Using Gunze Oil I added drops to various panel lines then I used a brush dipped in thinner and drew it in the direction of airflow and gravity. The model looks grungy and used now, just like what you see when you look at a photo.
Final bits and bobs
Adding the drop tank, guns, pitot tube and antennas made the model look busy. The canopy masks were removed and the headrest was added to the sliding section with white glue and the whole assembly was added to the aft fuselage with white glue. Adding an EZ Line antenna to the sliding section and some white glue insulators and the antennas were done. A drop of white glue mixed with Tamiya Clear Red and Clear Green and added to the wing tip lights.
I’ve tried to remove part J60, the loop antenna, on multiple kits and have never been able to get it off the sprue without breaking it. So I ended up taking one from an old Monogram 109 kit. The instructions show you to shorten the gun barrels on the outer wing guns which would be appropriate to the other two aircraft but not Priller’s. The instructions don’t explain this so check your references.
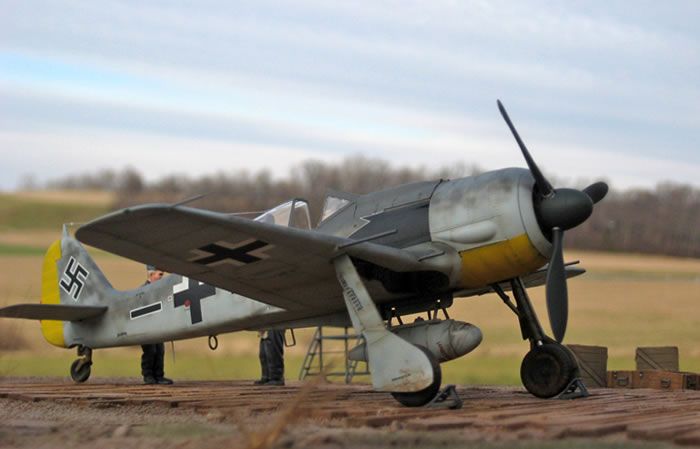
The instructions show some photo etch parts for the exhaust vents and wing gun cover hinges but this is a misprint. There is no photo etch included in this kit. These are left over instructions from the Eduard kit.
Add the prop and cooling fan to the nose and this model is ready to attack the Allies on D-Day.
This is my second Eduard kit, (yeah I know it is Accurate Miniatures) and I have to say that these kits are awesome. . The kit in my opinion is one of the finest kits I’ve had the pleasure to build.
This kit is the same as Eduard’s Weekend Edition A-8 with different decals, however, it does cost nearly twice as much
Now the instructions are a little bit of a let down. Accurate Miniatures should have proof read the instructions more. Does it matter? Not really when you look at the instructions and understand what is being asked for. Don’t forget to add the guns for the upper cowling and the ammo boxes though as they are never pictured. An experienced modeler will not have a problem.
The lack of instructions with the decals is annoying but online references are readily available to assist the modeler. In the end the model looks great, but at nearly twice the cost of the Eduard kit you have to ask why? If you want to build Priller’s, Willi Maximowitz or Ernst Schroder then I highly recommend this kit. If not I still highly recommend it however the Eduard Weekend kit is less expensive. Even if you use aftermarket decals the model is very nice. I recommend it to experienced models because of the omissions in the instructions. I think it is time to do an Eduard A-5 version. That is the best recommendation I can give this kit. It was a lot of fun and looks great. I think the Eduard/Accurate Miniatures FW-190s are the best on the market, period.
Thanks to Accurate Miniatures for the review copy. You can obtain your copy from your local hobby shop or online retailer.
Remember- Modeling is fun!
References
-
Walk Around 22- Focke-Wulf FW-190A/F, Malcolm Laing and E. Brown Ryle, Squadron/Signal, 2000, ISBN 0-89747-414-7
-
Aero Details 6: Focke-Wulf FW-190A/F, Shigeru Nohara and Masatsugu Shiwaku, Dai Nippon Kaiga Co., 1993, ISBN 4-499-22603-1
-
Focke Wulf Jagdflugzeug, Peter Rodeike, ISBN 3-923457-44-8
-
Photo Hobby Manual #1501-Special Drawings Focke Wulf FW-190 Part 1, Radek Vavrina, CMK, ISBN 9-788090 377844
-
JG 26: Photographic History of the Luftwaffe Top Guns, Donald L. Caldwell, Motorbooks International, 1994, ISBN 0-87938-845-5
Model,
Text Copyright © 2009 by Floyd Werner
Page Created 26 January, 2009
Last Updated 26 January, 2009
Back to HyperScale
Main Page |
Home
| What's New |
Features |
Gallery |
Reviews |
Reference |
Forum |
Search