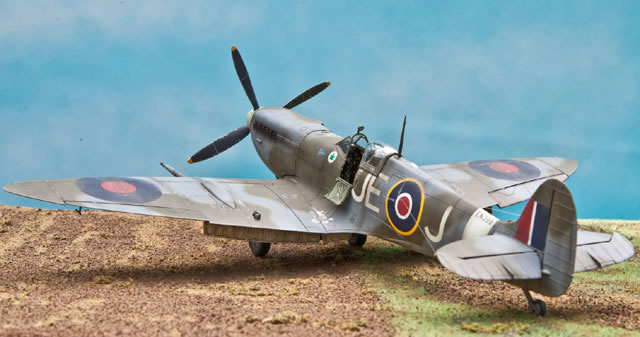
Tamiya's 1/32 scale
Supermarine Spitfire Mk.IXc
by Mario Riccioni

|
Supermarine Spitfire Mk.IXc |

Tamiya's 1/32 scale Spitfire Mk. IXc is available online from Squadron
They weren’t kidding when this kit was described as the most detailed 1/32nd scale aircraft ever made. The features that impressed me the most were:
The undercarriage is screwed into place; how many times have I anguished in the past, with getting those oleos to stand at the same angle?!
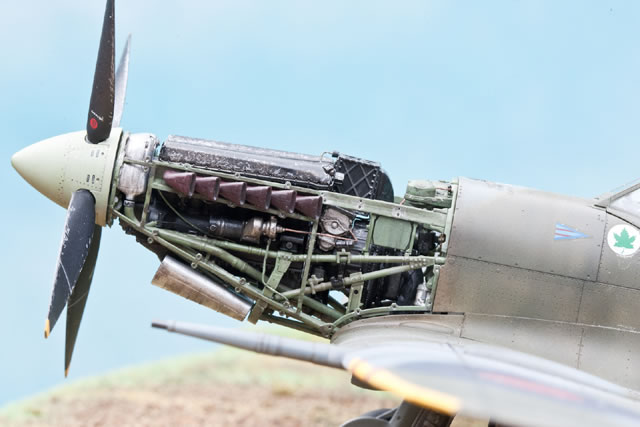
The magnetic engine covers have been talked about often enough, but the ingenious hiding places for those magnets is what impressed me; some inside the engine. And the engine covers themselves are molded so thin, giving them good scale proportion. Having said that I guess they had to be that thin, otherwise the superbly detailed engine was never going to fit, it’s all so snug in there, just like the real thing. Even so, I couldn’t get the cowl panels to sit right. One must build this kit terribly exact. When I look at the 2 fine examples of this model previously posted here by Brett Green and the other by Marcus Nicholls, it makes me wonder if they had similar difficulties, or is it just a lack of skill on my part; I’d say the latter is probably the case! You may notice that the engine image on the unpainted fuselage has the oil tank placed the wrong way around, and for a while I was scratching my head over why the bottom engine cover wouldn’t go on! This oversight is corrected of course on the final finished shot,……doh!

The way that the instruments are done is another example of remarkable thinking; the dials are drawn on the sticky side of the decal, placed on the clear parts which are then pushed into the holes of the instrument panel. To me it’s the most realistic effect I’ve ever seen and so easy. Why didn’t anyone else think of it?
Aside from all the innovations, the kit quality is great. The wing joins are absolutely perfect, no filling required. Other components fit together so tight, that at first you think they’re not going to go, then presto!
The reference images in the color booklet are excellent. I did my best to follow where all those lines and wires in the engine compartment go, but my knowledge of aero engines is limited. I put in as many as I could see, using various means, (electrical wire, stretched sprue, the wire found inside twist sticks was useful), but my engine bay still looks a bit stark compared to the real thing. I did the same with the interior. I didn’t see any point in putting in wires just for the hell of it, so I focused on historical accuracy, which I suppose is one of the aims of scale modeling.
It was a little ironic that having spent so much time and effort on the engine and interior, that the rest of the aircraft came together so quickly, in fact one weekend spent on the fuselage and wings and that was it, ready for paint! I suppose it was because no time was spent waiting for filler to dry and sand, that it was simply a case of systematically following the instructions.
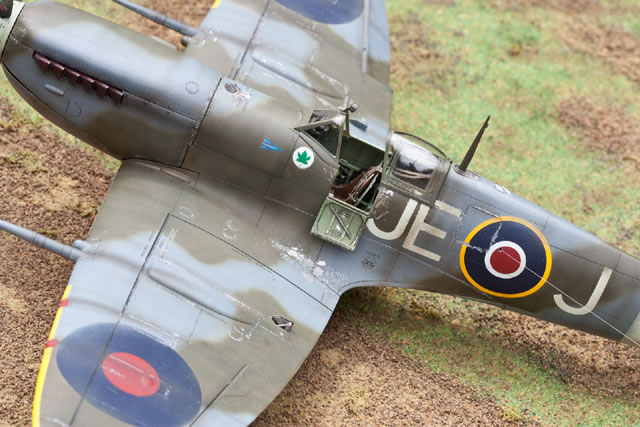
Doing this model has given me a new pet hate; photo-etched parts! They’re difficult to work with, hard to paint, but they’re value remains unquestioned. I’m not particularly fond of those large decals either. It was a stinking hot night when I was putting most of them on and they set almost immediately despite the gloss sealing coat and some of the lettering got stuffed up, requiring a great deal of time to repair the damage.

A welcome convenience is that the engine and firewall do not have to be attached until after the rest is painted, negating the need for masking; those Tamiya engineers are definitely part of this brotherhood
.
It is interesting that new colors were created for this model; an admission that their old ones weren’t accurate? There is also a difference between these new paints and the equivalent colors in the Mr. Hobby range. I don’t know which are more accurate and the new ones looked good to me so I went with them. Once shading and weathering enters the equation, there is no doubt going to be differences from kit to kit according to each model makers technique and perception. I chose to weather the aircraft heavily; my understanding is that Johnny Johnson’s Spitfire had only been penetrated once by a single cannon shell, hence his aircraft wasn’t constantly patched and re-painted, though I’m not exactly sure how many Mk IXs he actually flew.
My figure modeling is getting a bit better, although my finish on the finely sculptured figure of J. E. Johnson sort of resembles Virgil from the Thunderbirds! I must also thank young photographer Daniel Groszek of danielgphoto.com for another superb effort in bringing out the best in my work.
Image and Text Copyright ©
2010 by Mario Riccioni
Page Created 25 January, 2010
Last Updated
25 January, 2010
Back to
HyperScale Main Page

|
Home
| What's New | Features | Gallery | Reviews | Reference | Resource Guides | Forum |