Hasegawa 1/48 scale
RNZAF TA-4K Skyhawk
by Bruce Salmon
|
|
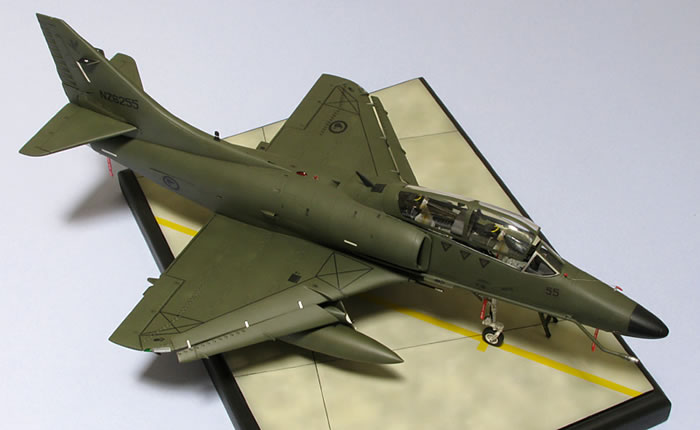
RNZAF TA-4K Skyhawk
Post-Kahu upgrade circa 2001
NZ6255 – the last T-Bird to fly in New Zealand |

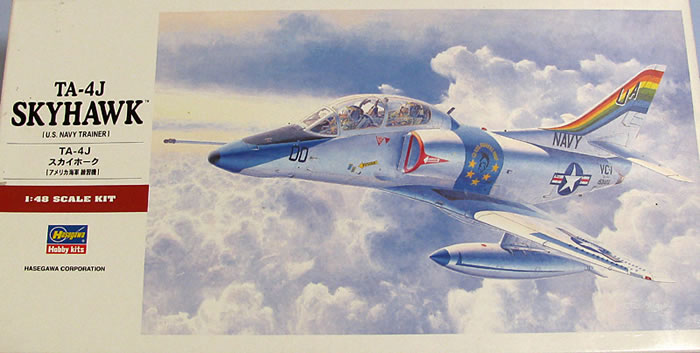
Hasegawa's 1/48 scale TA-4J Skyhawk is available online from Squadron.com
Formerly TA-4G N13-154911 with Royal Australian Navy, coded 880. First flight from Douglas factory at Long Beach on 21 July 1967. BOC with RAN on 31 July 1967 and served with No.724 Squadron. Withdrawn from RAN service on 30 June 1984. Ferried from Nowra to Ohakea on 12 July 1984. Converted to A-4K by RNZAF. Carried out wheels up landing on drop tanks at Ohakea on 14 September 1994 after losing right hand main landing gear touching down short of the runway. Repaired and returned to service. Took part in the farewell flyover of the North Island to commemorate the closure of the RNZAF Air Combat Force during the morning of 11 December 2001 and in the farewell flyover of the South Island that afternoon. To storage at Ohakea. Flew from Ohakea to New Plymouth and return on 14 June 2003, and then flew some reconversion details from Ohakea between 4 and 7 August 2003. Ferried to Woodbourne for storage awaiting sale on 11 August 2003.
Reference:
New Zealand Military Aircraft Serial Numbers
RNZAF McDonnell Douglas A-4K, TA-4K Skyhawk
http://adf-serials.com.au/nz-serials/nz6201.shtml
In 2001 Aunty Helen, the then New Zealand Prime Mimister, decided we couldn’t afford these toys so mothballed the lot. While I might agree that they weren’t really up to the job, they were seriously cool and noisy which is more than enough reason to keep them in my book.
Fast forward to 2012 – Nobody wanted them, or was allowed to have them so most are now destined for museums... No we don’t bury our flying heritage in a pit in the backyard – you know who I’m talking about Australia - ‘nuf said.
TA-4K NZ6255 is going to the RAN Museum at Nowra. It has been converted back to a TA-4G (externally) for them (drag chute, Kahu antennas and bits removed). It is also going to be repainted back in its old RAN camo colours once it gets over there.
The Hasegawa 1/48 scale TA-4J kit is a mix of old and new and it shows. Same old fit problems that the A4 series had with a few new ones thrown in.
The Post-Kahu RNZAF Skyhawk has a few bits that are specific to it, notably:
-
The cockpit needs to be F-16-ized – good luck with that.
-
You will need to fill the inlet on the LHS of the fuselage just forward of the airbrake.
-
Use the squared tail fin tip (part E14).
-
Make a small intake on the fuselage side just above the LH wing join straight down from the rear edge of the panel that the reflective strip is on.
-
Make strobe light on the upper fuselage ahead of anti-collision light.
-
Remove underside anti-collision light from the left undercarriage fairing and move to the right fairing.
-
Add UHF antenna on upper fuselage behind cockpit (part E1).
-
Add VHF/UHF aerial at the base of the tail (part E11).
-
Add VOR/ILS antennas on the tail fin. I modified (parts V24/25)
-
Add rear ECM antennas (parts D17/18).
-
Add wingtip ECM pods. I modified (parts F22).
-
Add underside lights to the wingtip nav lights.
-
Add ILS marker beacon blade antenna on underside of LH wing tip.
-
Shorten the brake parachute cover.
-
Add landing light to RH gear door.
-
The little underside vent (part E24) also needs to move across to the RHS.
-
Add blade antenna on LHS of underside of fuselage just forward of rear edge of nose wheel well (part F5).
Yeah, I think that’s about it.
Aftermarket Products Used:
-
Aires (4442) ESCAPAC 1G-2 Ejection Seats.
-
Aires Aero Bonus (48 022/3) Remove Before Flight Flags.
-
Eduard PE set (49 458) TA-4J Self Adhesive (Many parts not required for the RNZAF T-Bird).
-
Eduard PE set (48 644) A-4 Ladder.
-
Gekko Graphics Decals (GG48-001) RNZAF A4-G/K Skyhawks (1970-2001) Pt. 1
Construction began where it always should – good references! Unfortunately these are not as easy to come by as you would think. Having no easy access to a real T-Bird I had to rely on what I could find on the interweb and forums. Many of the pics available were not what a modeller requires and new things came to light as the build progressed necessitating some back pedalling to fix things I had already done as well as waiting for decals to be procured etc. I’m sure I will have missed some things as the experts out there will nodoubtedly inform me...
The very first thing I did was to make the nose and glue in the weight - wouldn’t want to forget that vital step!
Cockpit / Canopy
The cockpit was given an upgrade whereby I chopped up the Eduard TA-4J PE instrument panel and reassembled it with other scratch-built parts to mimic the RNZAF Kahu refit. It’s only about 80% correct but with the canopy almost closed you won’t notice the inaccuracies too much. Making the HUD proved the hardest part as the photos I had access to weren’t really good enough and getting the size right was a bit of a mission. The reflector glass was made from a solid piece cut from a cassette tape case. I almost gave up at one stage and thought it would be easier to just have a red cover over the whole thing but I’m glad I persisted as it turned out quite well. This was all achieved through wearing an Optivisor on my head while holding a 10X geologists hand lens in one hand and contorting myself into various positions and using what other limbs/digits were available to do the cutting/gluing/painting etc. I bet Doctor Octopus never had these problems...
The cockpit bulkheads (parts V26 & V29) needed the edges shimmed to fill the quite large gap between them and the fuselage sidewalls. Dryfitting the fuselage halves together at the same time was necessary to ensure that the seats would be centred.
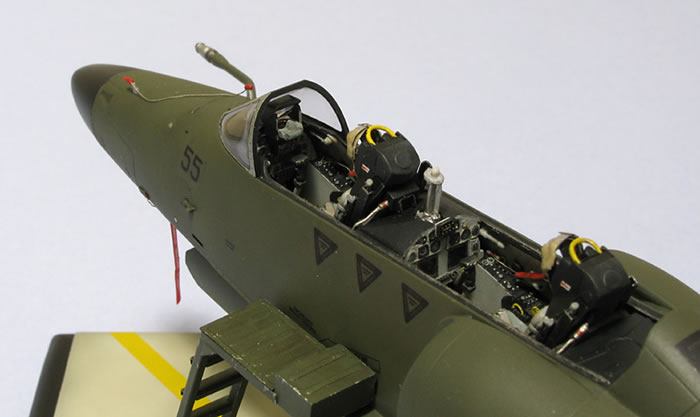
The cockpit was painted with a lightened 4/1 mix of Humbrol H127 Satin US Ghost Grey and H87 Steel grey. The seats were painted the same with more H87 added to make the cushions a bit darker. I added storage bags to the RHS sidewalls and poked some FBF flags into them - both were cut from wine bottle metal sheaths.
The resin Aires ESCAPAC 1G-2 Ejection seats I used are very nice. I upgraded them slightly to kinda represent the 1G-3 version the RNZAF were using at the time. I also filed grooves in the seat sides so that they would slide down the PE rails. Lastly I cut grooves along the cockpit rim using a Tamiya scriber followed by a round file and sandpaper.
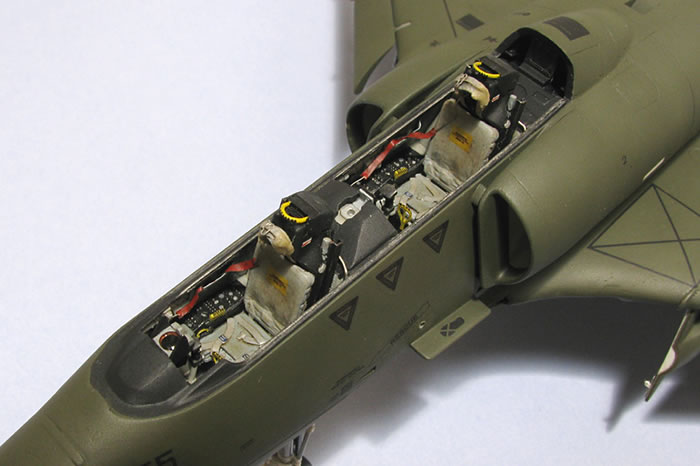
You need to decide early on if you want your canopy to be up or down. Be careful as cockpit part V12 does not match the drawing shown in the instructions - as it is it will only allow the canopy to be attached in the raised position. Surgery is needed if you want the canopy closed and a lot more to have it partially opened (cutting the back off the rear seat bulkhead and more). The canopy support piston was also cut down to the appropriate height to hold a partially opened canopy. I think TA-4s look quite mean in this configuration. I detailed the underside of the canopy central fairing but you can barely see it now it’s semi-closed.
The Eduard PE was a bit of a pain, for example the PE (39) that attaches to the rear canopy hinge (part V9) is too big and needs a load of filing before it will even fit in the canopy. Placement of numerous other PE parts is vague.
Fuselage
When you attach the intake fairings to the fuselage you will find there is a load of work needed to fill the gaps. The engine front face D12 also doesn’t align well with the inside of said fairings, you can see a thick joint edge on the inside. Thus the edges of the engine front face were sanded wafer thin but still it is noticeable. Much dryfitting and jiggery-pokery is necessary to minimise this fit problem.
Another area of woe is the underside of the rear fuselage where (part A6) attaches. This area requires a load of filling and sanding.
Wings
Where the rear of the leading edge slats fit onto the wing in their closed position you will need to fill the edge and sand it smooth as it doesn’t exist. The PE leading edge slat rails add a lot of strength to this area but also make the rails look overly thick. The leading edge landing light is just awful; it’s way too small! I spent days trying to fix it. After painting I removed the protective tape only to find it still looked like a disaster so I just painted over it as was common on RNZAF Skyhawks. Not to mention that the gear door light also had a big bubble right in the middle of it.
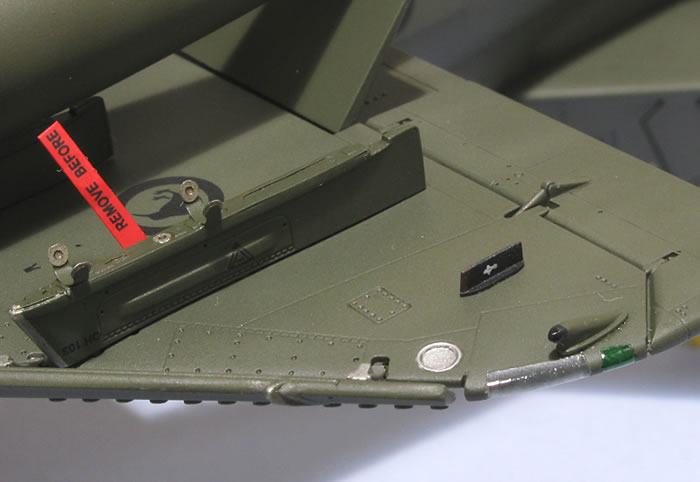
The trailing edges definitely need to be thinned out. I rushed the sanding of the tailplane elevator trailing edges – both were sanded more on one side than the other, a result of holding them both the same way while sanding. When they are glued in place it looks like one is slightly raised and the other lowered. Something to remember for next time! I also thinned them out a bit much and lost pointyness at the tips.
The wing/fuselage join is a bit gappy and this was remedied with some milliput which required no sanding afterwards. I also added a bit of extra wiring and other scratchbuilt bits to tart up the wheel wells.
Engine
What you can’t see up the jacksey was even more obscured with Model Master Exhaust Buffing Metalizer. The exhaust nozzle was painted Alclad aluminium and given a dirty oil wash.
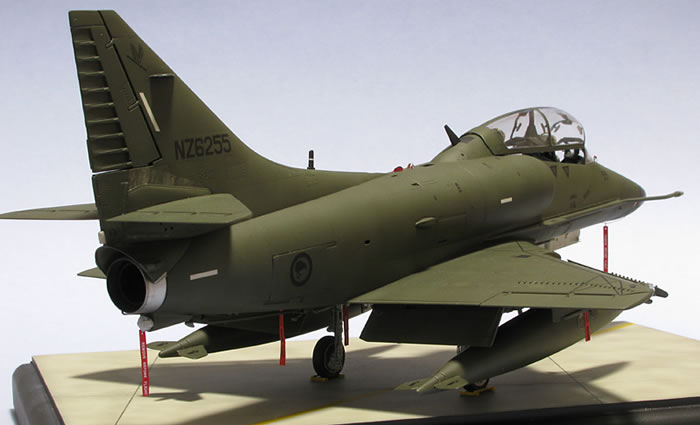
I also added a diesel pipe to the LHS under the nozzle which was used for making smoke during aerobatic displays.
Little Bits
The landing gear legs were given brake cables and other PE details. I thought about a replacement nose leg and separate wheel but instead I just carved around the edge of the wheel and painted in a black wash to create depth. Note: the Eduard replacement gear door for the nose (kit part V10) sits too far back inside the wheel well. In its correct position it should touch the rear edge of the well. Hasegawa gives no info on what angle the gear doors should hang at and you need to be careful with the main wheel doors as they will interfere with the fuel tanks necessitating splaying the pylons out at an awkward angle.
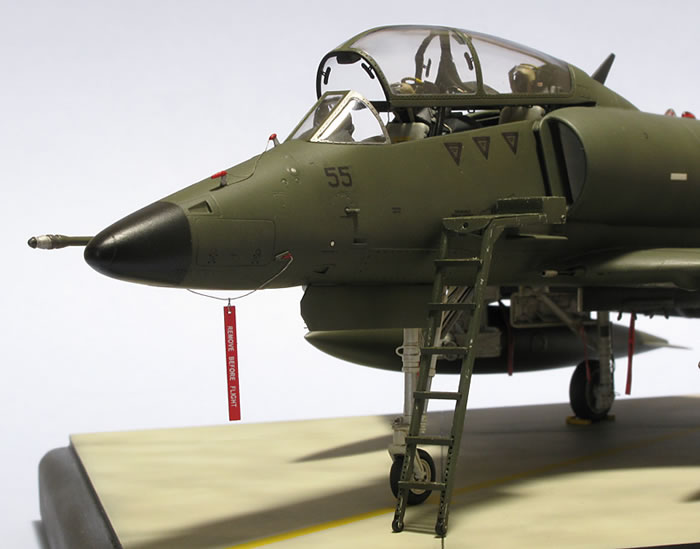
The fuel tanks needed a bit of bogging and sanding to get a proper shape to them and consequently I lost the raised panel join details. I also thinned out their fins to look more in-scale. The attachment points of the pylons and tanks were strengthened with wire. Note: the pylons have a grey rubber strip on their leading edge.
The Eduard ladder is very nice. I added kit part V20 to make it correct for the TA-4 and some wheels punched out from plastic card.
This is where the wheels began to fall off. I started out by spraying a primer undercoat using Alclad Grey Primer and Microfiller. This sprays very nicely although where you get sharp bends such as the wing to fuselage join it produces a very rough texture resembling a gravel road. A load of sanding was then required to fix these sometimes hard to reach places.
Once this was done I sprayed an all over coat of Xtracolor X110. The Skyhawk is a bit of a slippery sucker (that tail always seems to get in the way too) so it had to be painted in 3 sections to avoid getting fingerprints in the paintwork. Although the Xtracolor sprayed very nicely it seemed to be very translucent and I needed at least 15 coats before you couldn’t see through to the undercoat! Thus it was getting very thick and starting to fill the panel lines. I partially solved the problem by first spraying Humbrol H116 as a base coat so that I only needed 2 or 3 layers of Xtracolor to get it to match what I had already painted. The Xtracolor also took on average 3 days to dry; the canopy frame took 3 weeks! The longer the paint is sticky the higher the chances are that hairs and other muck will get stuck in it. Once dry a round of post-shading followed.
Things get worse... Next I would give it a gloss varnish prior to decaling. I have used Future in the past but decided that this would be noticeably too thick on a jet so tried a new product Alclad II lacquer Klear Kote. It sprays direct from the bottle and is supposed to go on over their metallic lacquer paints. The Xtracolor enamel had been dry for over a week so I thought the Klear Kote would probably not harm it. I was right – but it gets sticky again if you handle it for more than 5min and it also tends to wear off easily. I only had a small area of Alclad aluminium that I tried it on and it seemed to work OK but was possibly also a bit sticky. Because it was in an area that I didn’t handle I cannot be sure – I won’t throw this stuff out just yet. Consequently this stickiness attracted a load of crap to the surface. Although the Klear Kote sprayed well it left a pebbly surface which only got worse with more coats.
Resignedly I had to brush on Future for the decals – that also got hairs in it which needed sanding out. By the time this harrowing process was complete the thing was an ugly festering mess - yet I pressed on...
Paints Used: (mostly enamels)
Exterior:
Varnish:
-
Weathering satin – 2 gloss – 1 matt
-
Exterior/interior satin: 1 gloss – 2 matt
-
Exterior matt: 1 gloss – 3 matt
Decals
The Gekko Graphics decals seemed to go on OK, the big ones at least. The small ones however silvered quite badly. The replacement Tiki on the LHS tail tip needed a thousand cuts and an Olympic sized swimming pool of Mr Mark Softer to “reduce” the silvering. The “Don’t Walk” areas are the wrong shape and as I expected them to not settle down over the vortex generators I decided to cut mine into sections.
In some cases decal placement was not well indicated in the instructions and in other cases there were not enough provided. Worst of all there are no pics of the various aerials mentioned or a decent guide to their placement.
To model a T-Bird I needed a few extras like the “Danger Ejection Seat” triangles and serial numbers which were provided by a fellow modeller. These decals turned out a bit thick and showed a hard edge even after a matt varnish coat. To rectify this I bevelled the decal edges using a curved sanding stick made from a chopstick with a bit of sandpaper glued to the tip. Another coat of matt varnish and yes you can still see them – just not nearly as bad as before. Interestingly some of the Future surrounding the decals went a milky colour when I applied Mr Mark Softer. Another coat of Future over the top and it disappeared – weird.
Weathering
Once I was satisfied with the decalling I sprayed the entire model with commercial grade Wattyl Estapol polyurethane high performance interior clear house varnish ready for an oil wash. I prefer a satin finish because I like some of the wash to stick to the surface which makes the paintwork look a bit more discoloured. I use Winsor & Newton Artisan water mixable oil colours. I mix mine in “BAR’S BUGS” car window washer concentrate, straight out of the bottle (no dilution).
First up is a light general overall wash for the entire model using 50/50 raw umber and lamp black. I apply this to one section at a time (e.g. port wing then starboard wing etc.) using a soft 1cm wide brush in the direction of the airflow. I use the brush to soak up excess so it doesn’t pool and leave those dreaded tide marks. If I want to take more off I wash the brush in water to clean it first. Once that is dry-ish (overnight) I then apply darker washes, by adding some black to the original mix and apply it to places that are usually grubbier. I followed up with some drybrushing of grease stains etc and some very restrained paint chipping with Tamiya XF16 Aluminium.
Following this I spray a matt coat of varnish to seal it all in. The matt finish tends to tone down the weathering effects somewhat. Once dry all the sharp edges were taped over to prevent the paint wearing off during handling.
Final Assembly
It was a bit of a mind-bender to try and figure out which flimsy bits to put on first so that you wouldn’t break them off while installing other flimsies. I started with underside first - the landing gear and doors then on to the inner pylons and fuel tanks. As expected there was a fuel tank fit problem and I had to splay out the pylons to get the things to fit. Luckily the slats hide it a bit from the front and the flaps from the rear.
Then came the arrestor hook, various aerials and RBF flags (these are a bit thick but look OK with a coat of matt varnish). Note: not all the flags read “Remove Before Flight” some have other dire warnings, are various sizes or even just plain red. The pitot tubes were attached to the nose and painted followed lastly by the canopy. It’s a done-burger.
I still have to add little clear lights to the underside of the nav lights at some stage when I find some as I had sanded off the kit’s anaemic blobs.
Concrete Base
First I varnished the whole thing so that the surface wouldn’t soak up too much paint. Next I scribed some lines in the surface with my trusty Tamiya scriber then painted the black edge. Once dry I masked the edge and gave the top a bit of pre-shading along the join lines and other random patches. Next I sprayed a cloudy pattern using the following paint ratio: Tamiya XF-55 Deck Tan – 12 / XF-51 Khaki Drab – 1. This was then lightened with more Khaki Drab then eventually just white. Make sure to treat each concrete slab as an individual piece or you may end up with a big swirly mess.
This model fought me the whole way; you might even say it kicked my arse a fair bit. I’m sure glad the battle is over – victory is mine! Permission to make aeroplane noises.... Many of the problems were my own fault and I should have had it done in half the time. The end result was worth all the agony. The previous two sentences were copied verbatim from my Corsair article of 2 years ago. Doesn’t look like I’m learning any lessons does it?
I would like to thank Craig Sargent, Martin Short for the decals he provided and various members of the Wings over NZ Aviation forum for reference photos.
Funnily enough the same day I finished my model an A4-K showed up at the local Warbirds hanger at Ardmore Airfield – and yes I did miss a few doodads. Now the question is should I fix them? Maybe – but I think I will wait to see an actual T-Bird in the flesh first.
Images and Text Copyright ©
2012 by Bruce Salmon
Page Created 24 April, 2012
Last Updated
24 April, 2012
Back to
HyperScale Main Page

|
Home
| What's New |
Features |
Gallery |
Reviews |
Reference |
Forum |
Search